| [ Team LiB ] |
|
3.4 LayoutAs we saw in the previous chapter, the framework can modify a control's position and size automatically. We looked at the docking and anchoring facilities, but Windows Forms provides support for other styles of layout. The simplest of these is a fixed layout in a scrollable window. Splitter support is also built in. In this section, we will look at all these styles of layout, and then examine the mechanism in the framework that underpins them all. It is possible to extend the layout facilities to provide your own automatic layout strategies. We will look at the standard events that support this, and then see a simple example custom layout engine. 3.4.1 ScrollingWindows Forms provides a facility for enabling the contents of a control to exceed the control's size on screen, and for scrollbars to be added automatically to enable the user to access all of it. This functionality is provided by the ScrollableControl class. This is the base class of ContainerControl and of Panel, which means that this behavior is available to all forms, panels, and user controls. To enable automatic scrolling management, simply set the AutoScroll property to true. If the window is smaller than its contents, scrollbars will be added automatically. Of course, the class will need some way of knowing how large the window's contents are. By default, it will deduce this from its child controlsit will assume that the window's size should be exactly large enough to hold all the controls. Because automatic scrolling will make the scrollable area exactly large enough to hold the controls and no larger, the controls will be right up against the edge of the window when it is scrolled as far down or across as it can go. However, you can add some padding by setting the AutoScrollMargin property. This property's type is Size, which enables you to specify the vertical padding and the horizontal padding separately. So specifying a margin of new Size(10, 20) would leave 10 units of blank space to the right of the right-most control and 20 units of blank space beneath the lowest control. Alternatively, you can set the scroll size explicitly with the AutoScrollMinSize property, which is also of type Size. The space occupied by the controls will still be calculated as described above, but if the AutoScrollMinSize property is larger, its value will be used instead. (In fact, each dimension is used individuallythe effective window size will be wide enough for the controls and any padding specified with AutoScrollMargin, and at least as wide as AutoScrollMinSize.Width, and it will be tall enough for the controls and any padding, and at least as tall as AutoScrollMinSize.Height.) You should not use both docking (discussed in the following section) and scrolling in a single control. If you wish to have controls docked to the edge of a scrolling window, you should add a child Panel control and make that do the scrolling, setting the panel's Dock property to Fill so that it will use all the remaining space not used by other controls docked to the edges of the form. This is because the automatic scrolling logic does not interact well with the automatic layout logic used when docking. Figure 3-3 shows such a formit has a TextBox docked to the left and a Panel docked to fill the remaining area. The Form itself is not scrollable. The scrollbar is present because Panel's AutoScroll property has been set to true. Figure 3-3. Combining scrolling and docking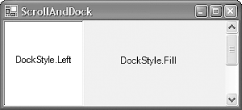 In fact, there is a little more to docking than was discussed in Chapter 2, so it is time to revisit the topic. 3.4.2 DockingWe saw in Chapter 2 how to get a control to attach itself to the edge of a form by using the Dock property. What we didn't look at was what happens when more than one control in a given window uses docking. Not only can you have multiple controls docked in a single window, you can even have more than one docked to the same edge, but it is important to understand exactly what the Windows Forms layout logic does under these circumstances. When two controls are docked on the same edge of a window, the behavior is straightforward. The control that is docked first will be up against the edge of the window, and the next one will be up against the first control, and so on. Every time a control is docked, it effectively defines that edge of the window for docking as far as other controls are concerned. (And any control that specifies Dock.Fill gets all the space left over.) This rule applies to multiple controls docked to different edges toothe first one to be docked always gets the entire edge, and each subsequent control gets whatever is left over. Figure 3-4 shows the effect of this for a pair of controls, one of which is docked to the top of the form, the other to the side. Figure 3-4. The impact of docking order But what determines the order in which docking occurs? If I have three controls all docked to the left edge of a window, the order in which they will appear is determined by the fact that the children of a control are held in an ordered collection. (The Controls property remembers the order in which you added the controls.) The later a control was added to the collection, the earlier it will be considered for docking. You can modify this order with the Forms Designer. If you bring a control to the front, it is moved to the top of the list of controls passed to AddRange, because when controls overlap, the ones at the front of this list appear on top. For docking, this will cause it to be docked last, so it will appear innermost. So if you have multiple controls docked to the same edge of a form, sending one of those controls to the back in the editor will move it to the edge of the form, and bringing it to the front will move it inwards. 3.4.3 SplittersThe purpose of a splitter is to divide a window into two resizable portions. For example, the bar that divides the folders pane from the contents pane in a Windows Explorer window is a splitter. The user can drag the splitter around to change the way the space is shared between the two panes. The Windows Forms framework supplies a Splitter control that provides this functionality. The Splitter control never actually moves anythingit relies on the framework's docking mechanism to do the work for it. The usual way of using a splitter is to have one between two other controls. The first control and the splitter are docked to the same edge of the window, usually the left or the top. The splitter should be docked towards the inside of the window (i.e., it should be ahead of the other control in the list passed to AddRange, which means putting it to the back in the Designer). The remaining control is then set to Dock.Fill so that it uses the remaining space. Figure 3-5 shows a typical layout for a vertical splitter. Figure 3-5. Use of docking for splitters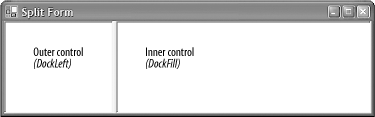 When the user drags a splitter, the splitter control only resizes the outermost control. This causes the window to perform a layout operation, recalculating the position of all docked controls. As a side effect of resizing the outermost control, when the splitter's position is calculated, it will automatically be moved to the edge of that panel. The splitter doesn't have to move itselfresizing the control it is docked up against is enough, because Windows Forms' automatic layout moves the splitter automatically. This in turn changes the amount of space available for the other control, and because that is set to Dock.Fill, the other control will fill the space available, shrinking or expanding as required. For the splitter to work, all three controls must be docked and in the correct order. It is fairly common practice for one or both of the controls to be Panel objectsthis allows you to place multiple controls inside the areas that the splitter resizes. This is useful if you want to use multiple controls in conjunction with a splitter, because a splitter can only cause the two controls on either side of it to be resized. 3.4.4 Layout EventsThe splitter relies on the automatic layout features of the Control class. Moreover, it relies on the control class automatically recalculating the layout as a result of one of its child controls being resized. This works because the Windows Forms framework is designed to support automatic re-layout in response to certain events. It also allows us to influence the way in which layout is performed. Any time a control is added to or removed from another control, or something is moved or resized, it is presumed that this will have an impact on how the form's contents should be arranged. So whenever this happens, the framework calls the parent control's PerformLayout method. This will perform the automatic docking and anchor layout, but before doing that it raises the Layout event. This gives our code a chance to execute custom layout logic. So during normal operation, layout will be performed every time a window changes size, or any of its contents are moved or resized. Most of the time, this is fine, but what about when we are creating the window? Everything we do during initialization would cause it to perform another layout. This would be a waste of time, because only the very last layout it does would stick. So during initialization, we call the form's SuspendLayout method at the start, and then the form's ResumeLayout method when we have finished arranging the contents of the form. (Visual Studio .NET puts these calls in for us.) This means we just get the one layout performed at the end of the initialization process, which is what we require. Sometimes you might want to take action to modify a form's layout only when particular things have happened. For example, your layout code might need to do something only when a form is resized and ignore all other events. In such cases, the Move and Resize events provide us with rather more specific notifications of what has changed than the firehose Layout event. 3.4.5 Custom LayoutSo why would we ever care about the Layout event? Unfortunately the Dock and Anchor properties don't cover every possible automatic layout eventuality. For example, a common requirement is to have several controls fill the width of a form (or maybe a panel in a form), sharing the space evenly between all the controls. (So if there are three controls across, each will take exactly a third of the space available.) This cannot be done with the standard docking and anchoring layout, so some custom logic must be used. The Layout event simply notifies us when it is time to apply that logic. Example 3-13 shows a simple custom layout handler that can be attached to a control's Layout event like so: myPanel.Layout += new LayoutEventHandler(HorizontalLayout); Example 3-14 shows the corresponding custom layout handler in VB. (The Panel control must also be declared programmatically using the WithEvents keyword.) Example 3-13. Example custom layout in C#private void HorizontalLayout(object sender,
System.Windows.Forms.LayoutEventArgs e)
{
Control parent = (Control) sender;
for (int i = 0; i < parent.Controls.Count; ++i)
{
Control child = parent.Controls[i];
int pos = i * parent.Width;
pos /= parent.Controls.Count;
child.Left = pos;
child.Width = parent.Width/parent.Controls.Count;
}
}
Example 3-14. Example custom layout in VBPrivate Sub HorizontalLayout(sender As Object, _
e As LayoutEventArgs) _
Handles myPanel.Layout
Dim parent As Control = DirectCast(sender, Control)
Dim child As Control
Dim I, pos As Integer
For i = 0 to parent.Controls.Count - 1
child = parent.Controls(i)
pos = i * parent.Width
pos /= parent.Controls.Count
child.Left = pos
child.Width = parent.Width/parent.Controls.Count
Next
End Sub
It will automatically adjust the width and horizontal position of each child control, so that they fill their parent control and are each of the same width. Note that you must attach this to the Layout event of the parent control whose children you wish to arrange, not the children themselves. |
| [ Team LiB ] |
|