6.2 Defining a Site
Before
plunging into the Site window, you should define
your site, which is done in the Site Definition dialog box. If you
are a graphical thinker, you may prefer to read Section 6.3 later in this chapter, to see
how the Site window looks and operates, before returning here. As
discussed in that section, you can view the Site window in several
different ways.
Whereas "creating" a site entails building HTML pages,
"defining" a site tells Dreamweaver to treat your
collection of pages as part of a larger whole. Although you can
define your site at any time, the earlier you do so, the sooner you
can take advantage of Dreamweaver's site management features.
 |
Whether you start a new site or manage an existing site with
Dreamweaver for the first time, the site definition procedure is the
same. Dreamweaver can manage any set of files contained in a single
local development folder and its subfolders (see Section 6.6 later in this chapter).
|
|
Create a separate site definition for each site you want Dreamweaver
to manage. Site definitions can be created and edited under
Site  Define Sites (and you can
switch between existing sites using Site Define Sites (and you can
switch between existing sites using Site  Open Site). When defining
a site, you specify such things as its home page, local directory,
remote directory, access method, server configuration, and file
tracking method. Open Site). When defining
a site, you specify such things as its home page, local directory,
remote directory, access method, server configuration, and file
tracking method.
To define a new site, use Site  New Site to open the Site
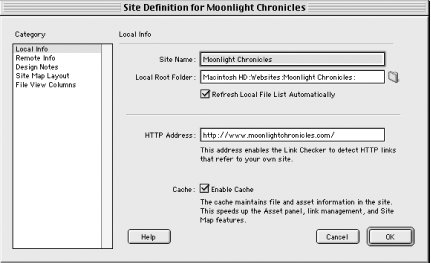
Definition dialog box shown in Figure 6-2. This
dialog box's options are broken down into five categories
(listed on the left side and discussed in the following sections).
Additional site preferences can be configured under
Edit New Site to open the Site
Definition dialog box shown in Figure 6-2. This
dialog box's options are broken down into five categories
(listed on the left side and discussed in the following sections).
Additional site preferences can be configured under
Edit  Preferences Preferences  Site. Site.
6.2.1 Local Info Category
The
Local
Info category of the Site Definition dialog box, seen in Figure 6-2, includes the options that tell Dreamweaver
about the development version of your site residing on your local
computer.
The Local Info category options are as follows.
- Site Name
-
A name of your choice used to identify the site in Dreamweaver; this
name appears under Site  Define Sites and in the Site pop-up
menu in the Site window. Define Sites and in the Site pop-up
menu in the Site window.
- Local Root Folder
-
The location of the top-level folder for the site on the local
machine (technically, the "local" folder could also be a
networked drive). This folder should contain the Home Page, as set
under the Site Map Layout category of the same dialog box. All files
for a web site, including HTML files, GIF files, etc., should be
placed in this folder or in subfolders beneath it. (If you link to
any files outside this folder, Dreamweaver prompts you to copy the
assets there.)
 |
Whether starting a new site or managing an existing site with
Dreamweaver for the first time, your Local Root Folder location
should be the folder containing your home
page. If your Local Root Folder pathname includes a
forward (/) or
backward slash
(\) character on the
Macintosh, it confuses Dreamweaver and
prevents you from using the Site Map feature.
|
|
- Refresh Local File List Automatically
-
If enabled, Dreamweaver automatically refreshes the Site
window's local file list when copying files from the web server
to the local drive.
- HTTP Address
-
The Internet address of the web site, such as http://www.yourdomain.com. This setting
allows the Link Checker to determine if an absolute URL refers to a
file within the site or to an external site.
- Cache
-
Enable this option to maintain a local cache file that speeds up the
Assets panel, link management, and the Site Map view.
6.2.2 Remote Info Category
The Site Definition dialog box's
Remote Info category defines the configuration of the remote server
where your live site is published. The appearance of the Remote Info
category pane varies, depending on the choice made for the
Server
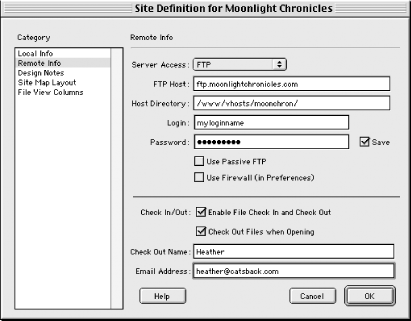
Access option. Figure 6-3 shows its appearance when
FTP access is
selected.
6.2.2.1 Access choice
The Server Access field has five options:
- None
-
Choose None if you do not plan to upload your site to a server or if
you don't yet have the detailed information required when using
the other options.
- FTP
-
Use FTP access (shown in Figure 6-3) if you upload
files to your web server via FTP, such as when using a typical dialup
or DSL connection. You'll need additional information provided
by your ISP or webmaster to complete the configuration as described
in the next section.
- Local/Network
-
Choose Local/Network access if your web server is a machine on your
local network, such as when publishing for an intranet. Instead of
literally uploading files to a remote site, they'll simply be
copied to the appropriate directory across the network.
- SourceSafe Database
-
Choose SourceSafe Database access if you're using
Microsoft's Visual SourceSafe project tracking database
software to collaborate with your development team.
- WebDAV
-
Choose WebDAV access if you're using a
file-tracking and version-control system based on the Web-based
Distributed Authoring and Versioning open standard.
6.2.2.2 FTP access
If you've chosen FTP access in the Remote Info category of
the Site Definition dialog box (shown in Figure 6-3), you'll need to supply the following
information to tell Dreamweaver how to reach the FTP server. If
you've used an FTP program to transfer files in the past, use
those same settings here for Dreamweaver's FTP access:
- FTP Host
-
Specify the address of FTP server, usually in the form ftp.someserver.com or www.someserver.com, not simply someserver.com. Don't include any
subdirectories, slashes, or @ signs, and don't include the
ftp protocol, such as in
ftp://ftp.someserver.com. If your
server doesn't use the default FTP port (26) specify the FTP
port, such as ftp.someserver.com:portNum.
The ftp server name may or may not match your domain name; ask your
webmaster or ISP if you're unsure.
- Host Dir
-
Specify the path of the folder that, with the FTP Host specified
earlier, points to your site's root directory on the remote
server (i.e., the one that contains your home page). The path may be
something like /www/htdocs/,
/virtual_html/, or /home/yourdomain/. Ask your ISP or webmaster
what folder is assigned for this purpose. You must specify an
existing folder on the remote site for the Host Dir. If necessary,
specify another folder temporarily, create a new folder in the Remote
Files pane of the Site window, and assign it as the Host Dir
afterwards.
- Login
-
Provide the login name for accessing the FTP server; this name may
not be the same login name that you use to access email from your
ISP.
- Password
-
Provide the FTP account password. Check the Save option so you
don't have to keep retyping your password (although you risk
someone else gaining access to your site if you share a computer or
lose your laptop).
- Use Passive FTP
-
Enable this option if your firewall allows passive FTP access only
(ask your webmaster).
- Use Firewall
-
Enable this option if you connect to the remote server from behind a
firewall. (Configure the firewall options under Edit  Preferences
  Site.) Site.)
The following options control how Dreamweaver tracks which files are
in use. All developers on a collaborative team should use File Check
In/Check Out. To check out a file means to take
ownership of it and prevent other users from making changes to it
while you make changes. To checkin a file means to submit your revisions and relinquish
exclusive control of the file.
- Enable File Check In and Check Out
-
Enable this option to use Dreamweaver's built-in file tracking
system. The next three options appear only if this checkbox is
enabled.
- Check Out Files when Opening
-
Enabling this option causes Dreamweaver to check out a file whenever
it is opened, which ensures that you don't edit a locked file.
If this option is disabled, Dreamweaver prompts you whether to View
or Check Out the file when you attempt to open a locked file.
- Check Out Name
-
Provide your name so others know to contact you if you've
checked out a file but never checked it back in.
- Email Address
-
Provide your email address so other team members can contact you via
email if you've checked out a file but never checked it back
in.
6.2.2.3 Local/Network access
If you've chosen Local/Network access in the Remote Info
category of the Site Definition dialog box (not shown in Figure 6-3) you'll need to supply the following
information to tell Dreamweaver where to copy the files over the
network for publication.
- Remote Folder
-
Provide the path to the network server directory that acts as the
root folder for your remote site. This path might look like
G:/www/public_html/foobar/ (ask
your webmaster or network administrator).
- Refresh Remote File List Automatically
-
Enable this option to refresh the Remote Files pane of the Site
window whenever files are transferred from the Local Files list.
When using Local/Network access, the File Check In and Check Out
options are the same as when using FTP access (described in the
previous section). Use of Local/Network access does not require a
Dreamweaver password setting. That said, to copy files to your
network server, you should log into your network prior to starting
Dreamweaver.
6.2.2.4 SourceSafe Database access
Visual SourceSafe is a
sophisticated project tracking software package from Microsoft. If
you've chosen SourceSafe Database access in the Remote
Info category of the Site Definition dialog box (not shown in Figure 6-3), you'll need Dreamweaver 4.01 plus
access to a Visual Source Safe (VSS) server and a VSS database.
Windows users must also install Version 6 or later of
Microsoft's VSS
Client. Macintosh users must install the Metrowerks VSS client as
described at:
- http://www.macromedia.com/support/dreamweaver/site/source_safe_mac/
- http://www.macromedia.com/support/dreamweaver/ts/documents/vss_on_mac.htm
These SourceSafe configuration options are accessed using the
Settings button in the Remote Info category of the Site Definition
dialog box (not shown). Ask your SourceSafe administrator for
assistance.
- Database Path
-
Specifies the path to the SourceSafe database's srcsafe.ini file that Dreamweaver uses to
initialize SourceSafe integration.
- Project
-
Provides the name of your project within the SourceSafe database (a
single database can manage multiple projects).
- Username
-
Provides your SourceSafe account username.
- Password
-
Provides your SourceSafe account password. Enable the Save option if
you don't want to keep retyping your password.
The final option determines how Dreamweaver integrates its File Check
In/Check Out feature with SourceSafe.
- Check Out Files when Opening
-
You should enable this option to allow Dreamweaver's File Check
In/Check Out feature to work cooperatively with SourceSafe. You need
not supply identifying information because Dreamweaver uses your
SourceSafe identity.
6.2.2.5 WebDAV access
WebDAV is an open standard for file tracking and version control
supported by some web servers. If you've chosen
WebDAV access in the Remote Info category
of the Site Definition dialog box (not shown in Figure 6-3), you'll need Dreamweaver 4.01 plus
access to a WebDAV-compatible server, such as Microsoft IIS 5.0 or
the Apache Web Server.
The WebDAV configuration options are accessed using the Settings
button in the Site Definition dialog box (not shown). Ask your WebDAV
administrator for assistance.
- URL
-
The URL of the root folder on the WebDAV server, beginning with
http://.
- Username
-
Provides your WebDAV account username.
- Password
-
Provides your WebDAV account password. Enable the Save Password
option if you don't want to keep retyping your password.
- Email
-
Provides your email address to be used within WebDAV.
The final option determines how Dreamweaver integrates its File Check
In/Check Out feature with WebDAV.
- Check Out Files when Opening
-
You should enable this option to enable Dreamweaver's File
Check In/Check Out feature to work cooperatively with WebDAV. You
need not supply identifying information because Dreamweaver uses your
WebDAV identity.
6.2.3 Design Notes Category
Design
Notes provide a means to track extra
file
information associated with web site documents, such as the location
of original artwork or comments regarding a file's status. The
options available under the Design Notes category of the Site
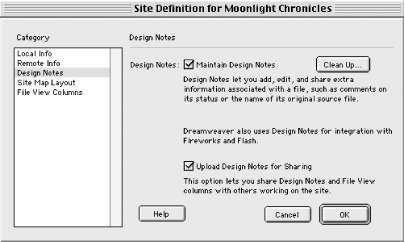
Definition dialog box are shown in Figure 6-4.
Design Notes are ideal for collaboration but act as useful reminders
even if you work alone. They are used for
Fireworks and Flash integration and therefore should be
turned on in most cases. See Section 6.5 later in this chapter for more details.
The dialog box options are as follows.
- Maintain Design Notes
-
You should enable Design Notes to take advantage of their many
benefits, including File View column sharing as described under Section 6.2.5.
- Cleanup
-
Use the Cleanup button to delete Design Notes associated with files
that have been deleted. (Dreamweaver handles this task for you if you
delete files using the Site window.)
- Upload Design Notes for Sharing
-
Enable this option to upload Design Notes to the web server for
sharing with other collaborators. The notes are
not made available to web site visitors. This
option must be enabled to support File View column sharing as
described in Section 6.2.5 later in
this chapter.
6.2.4 Site Map Layout Category
The Site Map Layout category of the Site
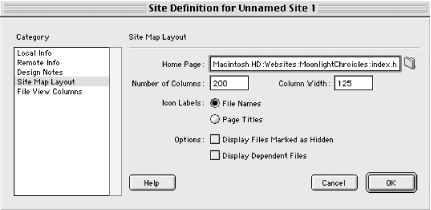
Definition dialog box, shown in Figure 6-5,
controls the site map's display (shown in Figure 6-9). This dialog box can be opened easily using
View
 Layout in the Site window (Windows) or
Site Layout in the Site window (Windows) or
Site  Site Map View Site Map View  Layout
(Macintosh); however, these menu options work only when the Site Map
view is open. Layout
(Macintosh); however, these menu options work only when the Site Map
view is open.
The Site Map Layout options are described next. The most important
item is the Home Page option; if it is set incorrectly, you
won't be able to access the Site Map view in the Site window.
- Home Page
-
Provides the path to the
site's home page, which should be located in the Local Root
Folder as specified under the Local Info category of the same dialog
box. If you haven't created your home page yet, leave this
option blank and set it later using
Site  Set as Home Page in the Site
window (Windows) or Site Set as Home Page in the Site
window (Windows) or Site  Site Map
View Site Map
View  Set as Home Page (Macintosh). Set as Home Page (Macintosh).
 |
If managing an existing site for the first time in Dreamweaver,
simply browse to your home page in your site's root folder. If
the path to your home page includes a forward (/) or
backward slash (\) character on the
Macintosh, it will confuse Dreamweaver and
prevent you from using the Site Map feature.
|
|
- Number of Columns
-
Specifies the number of file icons to display per row in the site
map. If this number if large, the site map may be very wide. If the
number is small, the site map will require more vertical space in the
Site Map window.
- Column Width
-
Specifies the spacing between columns in the site map (between 70 and
1,000 pixels). If the width is too narrow, items may be too crowded
to readóbut the width of individual columns can be set by
clicking and dragging the vertical arrows in the Site Map window (see
Figure 6-9). Use the Zoom pop-up menu in the
lower-left corner of the Site window to change the site map's
magnification.
- Icon Labels
-
Specifies whether to display filenames or document titles below the
icons in the Site Map view. Toggle this option using Ctrl+Shift+T
(Windows) or Cmd+Shift+T (Macintosh). You can also run a report to
detect untitled documents. The Site Files pane always shows
filenames, but a document's title is shown at the bottom of the
Site window when you roll over its name in the file list.
- Display Files Marked as Hidden
-
Determines whether all files marked as hidden should be omitted from
the site map. This option is also available under View  Show
Files Marked as Hidden in the Site window (Windows) or Site Show
Files Marked as Hidden in the Site window (Windows) or Site  Site Map View
  Show Files Marked as Hidden (Macintosh). To mark
an individual file as hidden, use Show/Hide Link from the contextual
menu in the Site window, Ctrl+Shift+Y (Windows), or Cmd+Shift+Y
(Macintosh). When hidden files are displayed, their names are shown
in italics. Show Files Marked as Hidden (Macintosh). To mark
an individual file as hidden, use Show/Hide Link from the contextual
menu in the Site window, Ctrl+Shift+Y (Windows), or Cmd+Shift+Y
(Macintosh). When hidden files are displayed, their names are shown
in italics.
- Display Dependent Files
-
Determines whether to show dependent files (such as GIFs, JPEGs, and
PNGs) embedded within each web page. If this option is disabled, only
the files that are connected via hyperlinks are shown in the site
map.
6.2.5 File View Columns Category
The
File View Columns category of the
Site Definition dialog box, shown in Figure 6-6,
controls the appearance of the Site Files view (shown in Figure 6-14). This dialog box can be opened by choosing
View  File View Columns in the
Site window (Windows) or Site File View Columns in the
Site window (Windows) or Site  Site
Files View Site
Files View  File View Columns (Macintosh). File View Columns (Macintosh).
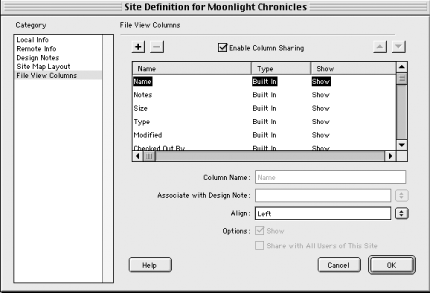
The File View Columns options are described next. They can be used to
show the file's name, modification date, and type, and even
information from Design Notes.
- Enable Column Sharing
-
Enabling this option allows new columns you define to be shared by
other users on your development team. It also allows you to access
shared columns that other users have created. After enabling sharing,
you can designate specific columns to be shared using the Share with
All Users of This Site option. To share columns, Design Note sharing
must be enabled in the Design Notes category of the same dialog box.
- Column List
-
The items (rows) in the scrolling Column List configure the columns
shown in the Site Files window (i.e., the row
labeled Notes controls the Notes column in the
Site Files window as shown in Figure 6-14).
Don't confuse these columns with the Name, Type, and Show
columns in the Column List itself.
Select an item in the Column List to set its individual properties.
Add a Personal (i.e., custom) item by clicking
the plus (+) button (see Figure 6-6). Clicking the
minus (-) button will delete an item without warning (but items can
be recreated easily). The built-in items Name, Notes, Size, Type,
Modified, and Checked Out By cannot be deleted (however, all but the
Name column can be hidden). Use the up and down arrow buttons to
control the order of the rows, which determines the order of the
columns in the Site Files window. The Checked Out By column is useful
for tracking who has a file checked out when using
Dreamweaver's File Check In/Check Out feature.
The following five options apply to each item in the Column List
(although some can't be changed for built-in items):
- Column Name
-
A new name of your choice for the custom column when displayed in the
Site Files view. The names of built-in columns cannot be changed.
- Associate with Design Note
-
This option's name is misleading. It allows data entered in
Design Notes to be displayed in the custom columns you've
defined for the Site Files window. For now, you can choose Status,
which is one of the predefined fields (pieces of
data) that can be extracted from Design Notes. See the discussion
under Section 6.5 later in this
chapter for details on displaying other data, including the assigned,
due, and priority fields. (Fields are also known as
name/value pairs.)
- Align
-
Controls the alignment (Left, Right, or Center) of column data.
- Show
-
Use this checkbox to show or hide the selected column in the Site
Files view. The built-in Names column cannot be hidden, but this
option is useful for hiding the other built-in columns, which cannot
be deleted.
- Share with All Users of This Site
-
Enable this option to make this column available to other users who
have enabled sharing. This option lets you selectively share columns,
provided that Enable Column Sharing is enabled. The built-in columns
are always shared by all users.
Once you've finished defining your site, click OK in the Site
Definition dialog box.
6.2.6 Editing a Previously Defined Site
Editing a previously defined
site is not the same thing as creating a
site definition to manage an existing site in Dreamweaver for the
first time.
 |
To create a site definition for an existing site, see Section 6.6 later in this chapter.
|
|
To transfer
site
definition files between computers, use the Site Import Export
extension available from the Dreamweaver Exchange (as
explained in Chapter 22). Dreamweaver 4 reads site definitions from
earlier versions of Dreamweaver.
To edit an existing site definition, choose Site  Define Sites,
which opens the Define Sites dialog box, shown in Figure 6-7. Define Sites,
which opens the Define Sites dialog box, shown in Figure 6-7.
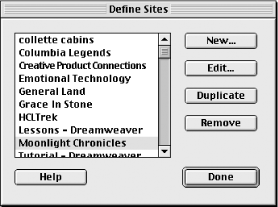
From this dialog box you have four options:
- New
-
Creates a new site definition (same as Site  New Site). New Site).
- Edit
-
Edits an existing site definition.
- Duplicate
-
Duplicates an existing site definition to use as the basis for a new
one. Be sure to change the Local Root Folder and HTTP Address under
the Local Info category, the remote server settings under the Remote
Info category, and the Home Page under the Site Map Layout category.
If two sites share the same Local Root Folder, Dreamweaver's
file management and synchronization features may not work properly.
- Remove
-
Deletes an existing site definition. Deleting a site definition does
not delete HTML and asset files within the site, but it does delete
Design Notes.
Note that the Site  Open Site command is not used to edit a
site definition; instead, it "loads" an existing site
definition, allowing you to switch between web site projects. You can
also switch sites using the Site pop-up menu in the toolbar of the
Site window (see Figure 6-8). Open Site command is not used to edit a
site definition; instead, it "loads" an existing site
definition, allowing you to switch between web site projects. You can
also switch sites using the Site pop-up menu in the toolbar of the
Site window (see Figure 6-8).
 |
Double-click the current site's name in the
Site pop-up
menu in the Site window's toolbar to quickly open the current
site definition for editing.
|
|
6.2.7 Creating a New Site from Scratch
If you have an existing collection of web pages, you can create a new
site definition for them by using the procedures described earlier in
this chapter under Section 6.2. Section 6.2.7.1 shows how to define a site before creating
your web pages.
6.2.7.1 Procedure 2
Choose Site  New Site. New Site.
Under the Local Info category of the Site Definition dialog box,
specify the site's home directory in the Local Root Folder
field. You can browse to an existing folder, or even create a new
folder from within the folder selection dialog box, as indicated in
Figure 6-1.
Set the options under the other categories of the Site Definition
dialog box as desired. At a minimum, specify the remote server access
information under the Remote Info category; you can temporarily set
the Server Access to None if you don't have the information
handy.
You can leave the Home Page field under the Site Map Layout category
blank for now; we'll set it during Step 9.
Click OK to save the site definition for this site. Dreamweaver will
open the Site Files view of the Site window.
Use File  New Window in the Site window (Windows) or File New Window in the Site window (Windows) or File
 New (Macintosh) to open an untitled Document window. Use File New (Macintosh) to open an untitled Document window. Use File
 Save As to immediately save the file as home.html in the
site's local root folder, as defined in Step 2. (The
filenamehome.html is an example.
Your web server may prefer home.htm, index.html, index.htm, default.html, or default.htm.) Save As to immediately save the file as home.html in the
site's local root folder, as defined in Step 2. (The
filenamehome.html is an example.
Your web server may prefer home.htm, index.html, index.htm, default.html, or default.htm.)
Add whatever content you like to the home page using the Document
window, Objects panel, etc. Dreamweaver may prompt you to copy
dependent files, such as GIFs, to the site's local root folder.
Resave the document.
Use Window  Site Files (F8) to return to the Site Files window.
Your new home.htmlfile should
appear in the Local Files pane on the right side of the window. Site Files (F8) to return to the Site Files window.
Your new home.htmlfile should
appear in the Local Files pane on the right side of the window.
Select the home.html file in the
Local Files list by clicking it once. Then choose Site  Set as
Home Page in the Site window (Windows) or Site Set as
Home Page in the Site window (Windows) or Site  Site Map View Site Map View
 Set as Home Page (Macintosh) to tell Dreamweaver to use this
file as the site's home page. Set as Home Page (Macintosh) to tell Dreamweaver to use this
file as the site's home page.
Click and hold the Site Map button in the Site window's toolbar
(see Figure 6-9), and choose the Map and Files
option. Your home page should appear on the left in the Site Map pane
of the Site window. The right pane should continue to show the Local
Files list.
Congratulations! You've set up your site and defined its home
page. See the next section for details on using the Site window to
build and manage sites.
|


