|
|
< Day Day Up > |
|
2.2 Building and Running CodeHow do you create the Java
.class files that are the end result of
developing a project? You use the items in the Project menu. The main
menu item here is the Project It often makes sense to store all your project's source code in a folder named src and the binary output in a folder named bin. If you want to set things up this way when you create a new project, open the New Java Project dialog as usual, and, in the second pane, click the Source tab followed by the Add Folder button. Doing so opens the Source Folder Selection dialog; click the Create New Folder button and give the new folder the name src. Then click OK twice. Eclipse will recognize that you're creating a source code folder and automatically ask if you want to create a bin folder for the binary output, as you see in Figure 2-10. Figure 2-10. Creating source and bin folders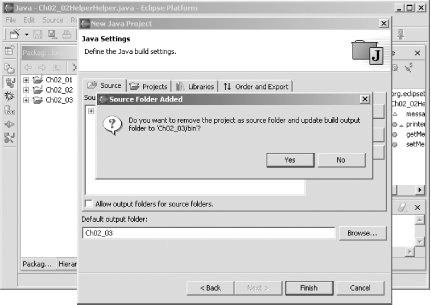 Configuring a project this way automatically stores your source code in the folder named src and the binary output in a folder named bin (bin will not appear in the Package Explorer because it doesn't contain any source code). 2.2.1 Using JAR and .class FilesSay that you're writing a Java servlet (for more details on servlets, see Chapter 9), shown in Example 2-4. Example 2-4. The Ch02_04.java examplepackage org.eclipse.ch02;
import java.io.*;
import javax.servlet.*;
import javax.servlet.http.*;
/**
* @author Steven Holzner
*
* To change the template for this generated type comment go to
* Window>Preferences>Java>Code Generation>Code and Comments
*/
public class Ch02_04 extends HttpServlet {
public void doGet(HttpServletRequest request,
HttpServletResponse response)
throws IOException, ServletException
{
response.setContentType("text/html");
PrintWriter out = response.getWriter( );
out.println("<HTML>");
out.println("<HEAD>");
out.println("<TITLE>");
out.println("A Web Page");
out.println("</TITLE>");
out.println("</HEAD>");
out.println("Hello there!");
out.println("</BODY>");
out.println("</HTML>");
}
}
The code in this example relies on classes like HttpServlet that don't come built into the Java core libraries. Since Eclipse can't find some of the required classes, you'll see plenty of wavy red underlines as you enter this code, as in Figure 2-11. Figure 2-11. Plenty of import not found errors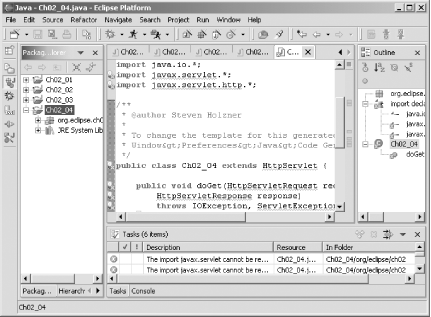 You can fix this easily by including the correct Java Archive (JAR) file in the classpath, which, in this case, is servlet.jar. This JAR file comes with the web server we're going to use later in the book, Apache Tomcat. To add servlet.jar to the classpath, right-click the project in the Package Explorer and select the Properties item, opening the dialog you see in Figure 2-12. Figure 2-12. The Properties dialog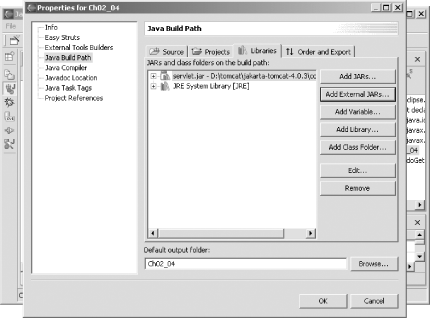 In this case, you select the Libraries tab in this dialog, click Add External JARs, navigate to servlet.jar, and click OK. Doing so adds servlet.jar to the classpath, as you see in Figure 2-12. Click OK to close the Properties dialog and build the project; when you do, things work out fine, as you can see in Figure 2-13, because the needed JAR file is now in the classpath—you can see the reference to servlet.jar in this project in the Package Explorer at left. Figure 2-13. A new JAR file in the build path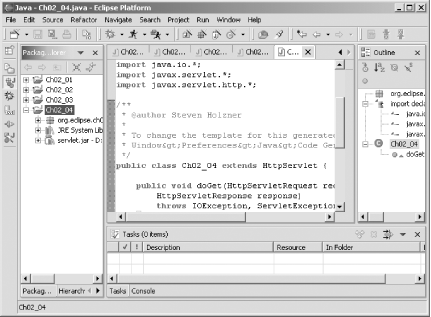 If you know you're going to be using a JAR file like servlet.jar when you first create the project, you can add that JAR file to the project's classpath in the third pane of the New Project dialog. You'll see the same tabs there as you do in Figure 2-12—just click the Libraries tab and add any JAR files you want to the project. If you add multiple JAR files to the classpath, you can also indicate the order in which you want them searched—just select the Order and Export tab in the Properties dialog, as you see in Figure 2-14, and change the order of imported items with the Up and Down buttons. You can also indicate which items to export by selecting their checkboxes here; when you export an item, it becomes available to any project dependent on the current project. Figure 2-14. Setting import order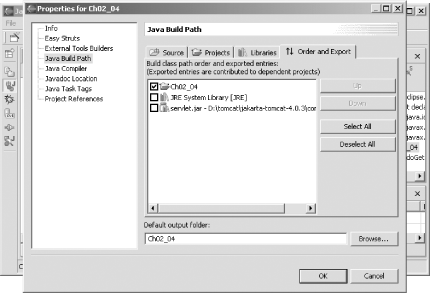 You can also add .class files to the classpath—just use the Add Class Folder button in the Properties dialog to add a folder containing .class files.
Say that you're going to
be developing more than one servlet; in this case, you might want to
make things easier on yourself by creating a classpath
variable corresponding to
servlet.jar. You can use that variable to add
servlet.jar to the classpath. To create a
classpath variable, select Window Figure 2-15. Creating a classpath variable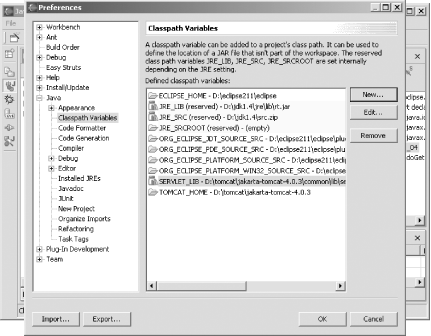 Now, when you want to add this classpath variable to a project's classpath, just open the project's Properties dialog, click the Libraries tab, click the Add Variable button that you see in Figure 2-12, and select the variable you want to add to the classpath. Using classpath variables like this is not only convenient, but it also centralizes your classpath references—for example, if you want to use a new version of servlet.jar, all you've got to do is update the classpath variable. 2.2.2 Setting the Launch ConfigurationSay that your code needs to read command-line arguments, as you see in Example 2-5, where we're displaying the first word passed on the command line to our code. For example, you could start this program on the command line like this: %java Ch02_05 Hello! (we'll use % for a generic command-line prompt in this book), and you'd expect the program to display the word "Hello!" Example 2-5. The Ch02_05.java examplepackage org.eclipsebook.ch02;
/**
* @author Steven Holzner
*
* To change the template for this generated type comment go to
* Window>Preferences>Java>Code Generation>Code and Comments
*/
public class Ch02_05 {
public static void main(String[] args) {
System.out.println(args[0]);
}
}
Unfortunately,
when you run this code as is, you'll get the error
java.lang.ArrayIndexOutOfBoundsException
at
org.eclipsebook.ch02.Ch02_05.main(Ch02_05.java:18)
in the console window because we haven't supplied
any command-line arguments to be stored in the
args array. You can supply command-line arguments
in the launch configuration for this project; to set that
configuration, select the Run Figure 2-16. Setting a launch configuration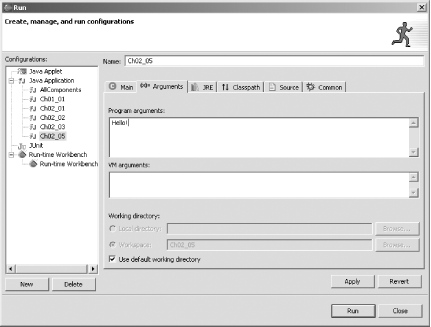 In this dialog, enter "Hello!" in the Program arguments box, as you see in Figure 2-16. If you want to, you can also enter Java Virtual Machine options in the VM arguments box here, as well as select what Java runtime environment you want to work with by clicking the JRE tab. After you enter "Hello!" in the Program arguments box, click Run and the code in your project will read that command-line argument and display it, as you see in Figure 2-17. Figure 2-17. Supplying command-line arguments to a program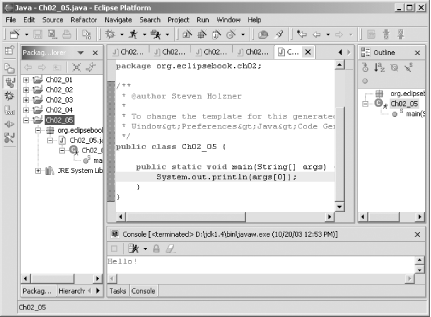 2.2.3 Selecting the Java Runtime When you run Eclipse for the first time,
it searches for installed Java runtimes, and it may not use the one
you want it to use. For example, Eclipse may want to use the outdated
JRE that came with your browser instead of the brand new Java SDK
you've just downloaded. You can specify what Java
runtime you want Eclipse to use by selecting Window Figure 2-18. Selecting a JRE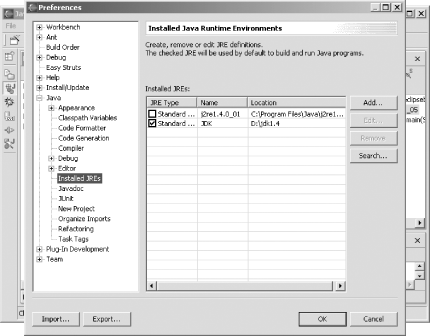 |
|
|
< Day Day Up > |
|