|
|
< Day Day Up > |
|
Recipe 12.9 Creating Actions12.9.1 ProblemYou want to create menu items and toolbar buttons and connect Java code to them. 12.9.2 SolutionCreate a new action, add menu items and toolbar buttons, and implement what you want to have happen in Java. 12.9.3 DiscussionBuilding upon the example developed in the previous two recipes,
we'll now add menu items and a toolbar button to the
plug-in. Right-click Action Set
1 in the Extensions box of the plug-in manifest
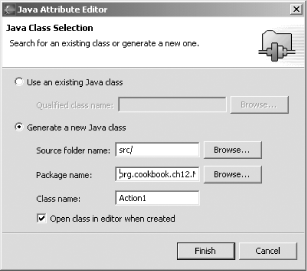
editor and select New To connect the action to code, select the action, Action 1, in the Extensions box, and click the ellipsis (...) button that appears when you select the class property in the Properties view. This opens the Java Attribute Editor shown in Figure 12-21. Figure 12-21. Creating an action class Select the "Generate a new Java class" radio button, enter org.cookbook.ch12.MenuPlugInFromScratch in the "Package name" box (or click the Browse button and select that package), and name the class Action1, as shown in the figure. Then click Finish. This creates the new action and adds its Java support file, Action1.java, to the project. 12.9.4 See AlsoRecipe 12.7 on responding to user actions in a plug-in; Recipe 12.10 on coding a plug-in action; Chapter 11 of Eclipse (O'Reilly). |
|
|
< Day Day Up > |
|