|
|
< Day Day Up > |
|
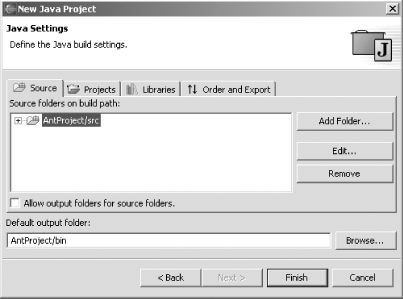
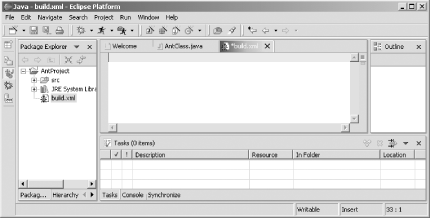
Recipe 7.1 Connecting Ant to Eclipse7.1.1 ProblemYou want to start working with Ant from Eclipse, but you need to know how to connect Ant to Eclipse. 7.1.2 SolutionAll you have to do is to add a build.xml file to an Eclipse project. Eclipse will know that a file with that name should be treated as an Ant build file. 7.1.3 DiscussionAs an example, we'll create an Ant build file, build.xml, that builds an Eclipse project, storing the resulting .class file in a .jar file stored in the directory we want. To follow along, create a Java Eclipse project named AntProject. Store the source for this project in a folder named src and the output in a folder named bin. In the third step of the New Project dialog, the Java Setting dialog, click the Source tab and the Add Folder button. Then click the Create New Folder button to open the New Folder dialog. Enter src in the Folder name box and click OK twice. Eclipse will ask: Do you want to remove the project as source folder and update build output folder to 'AntProject/bin'? Click Yes, which gives you the results shown in Figure 7-1. Click Finish to finish creating the project, which now includes src and bin folders. Figure 7-1. Creating the AntProject project Add a new class, AntClass, in the org.cookbook.ch07 package. We're just going to use some sample code in this class to display a message, as shown in Example 7-1. Example 7-1. Simple Ant test classpackage org.cookbook.ch07;
public class AntClass
{
public static void main(String[] args)
{
System.out.println("This code is stored in a JAR file.");
}
}Add a file named build.xml to the project by
right-clicking the project in the Package Explorer and selecting
New Figure 7-2. Creating build.xml This file, build.xml, is the XML file Ant uses to build the project. Begin this file with the standard XML declaration and an Ant project element: <?xml version="1.0" encoding = "UTF-8"?>
<project name="AntProject" default="Build" basedir=".">
.
.
.
</project>You can set properties in Ant build files both to centralize the definitions of terms you'll use later in a build file and to interact with Ant. In this case, we're going to specify that Ant should use the same compiler that we use in the JDT by setting the build.compiler property to org.eclipse.jdt.core.JDTCompilerAdapter like so: <?xml version="1.0" encoding = "UTF-8"?>
<project name="AntProject" default="Build" basedir=".">
<property name="build.compiler"
value="org.eclipse.jdt.core.JDTCompilerAdapter"/>
.
.
.
</project>We'll also add the following properties to the build file that correspond to the various build paths used in this project:
Enter these properties into build.xml in the Eclipse editor: <?xml version="1.0" encoding = "UTF-8"?>
<project name="AntProject" default="Build" basedir=".">
<property name="build.compiler"
value="org.eclipse.jdt.core.JDTCompilerAdapter"/>
<property name="srcDir" location="src"/>
<property name="binDir" location="bin"/>
<property name="jarDir" location="${binDir}/lib"/>
<property name="jarFile" location="${jarDir}/AntProject.jar"/>
.
.
.
</project>Ant build files are constructed around Ant targets. In this example, the first target will delete everything currently in the output directory, bin, and in the .jar file output directory, bin/lib, and then reconstruct those directories. We'll do that in a target named Initialization: <?xml version="1.0" encoding = "UTF-8"?>
<project name="AntProject" default="Build" basedir=".">
<property name="build.compiler"
value="org.eclipse.jdt.core.JDTCompilerAdapter"/>
<property name="srcDir" location="src"/>
<property name="binDir" location="bin"/>
<property name="jarDir" location="${binDir}/lib"/>
<property name="jarFile" location="${jarDir}/AntProject.jar"/>
<target name="Initialization">
<delete dir="${binDir}"/>
<delete dir="${jarDir}"/>
<mkdir dir="${binDir}"/>
<mkdir dir="${jarDir}"/>
</target>
.
.
.
</project>The next Ant target, Compilation, will compile the source file and put the resulting .class file into the bin directory. Note that this target depends on the Initialization target having been built successfully: <?xml version="1.0" encoding = "UTF-8"?>
<project name="AntProject" default="Build" basedir=".">
<property name="build.compiler"
value="org.eclipse.jdt.core.JDTCompilerAdapter"/>
<property name="srcDir" location="src"/>
<property name="binDir" location="bin"/>
<property name="jarDir" location="${binDir}/lib"/>
<property name="jarFile" location="${jarDir}/AntProject.jar"/>
<target name="Initialization">
<delete dir="${binDir}"/>
<delete dir="${jarDir}"/>
<mkdir dir="${binDir}"/>
<mkdir dir="${jarDir}"/>
</target>
<target name="Compilation" depends="Initialization">
<javac srcdir="${srcDir}"
destdir="${binDir}">
</javac>
</target>
.
.
.
</project>The Jar target compresses AntProject.class into a .jar file and stores that file as ${jarfile}. Note that this target depends on the Initialization and Compilation targets having already been built. <target name="Jar" depends="Initialization, Compilation">
<jar destfile="${jarFile}" basedir="${binDir}"/>
</target>Now create the main target for this build file, called Build. This target coordinates all the other targets by requiring them to have been completed, and it displays a message, Ant is building your project.. The following shows how the Build target looks. <target name="Build" depends="Initialization, Compilation, Jar">
<echo message="Ant is building your project."/>
</target>Finally, we'll make the Build target the default target of the build file in the <project> element so that Ant knows to begin with it. You can see how this works in the complete build file in Example 7-2. Example 7-2. Completed build.xml<?xml version="1.0" encoding = "UTF-8"?>
<project name="AntProject" default="Build" basedir=".">
<property name="build.compiler"
value="org.eclipse.jdt.core.JDTCompilerAdapter"/>
<property name="srcDir" location="src"/>
<property name="binDir" location="bin"/>
<property name="jarDir" location="${binDir}/lib"/>
<property name="jarFile" location="${jarDir}/AntProject.jar"/>
<target name="Initialization">
<delete dir="${binDir}"/>
<delete dir="${jarDir}"/>
<mkdir dir="${binDir}"/>
<mkdir dir="${jarDir}"/>
</target>
<target name="Compilation" depends="Initialization">
<javac srcdir="${srcDir}"
destdir="${binDir}">
</javac>
</target>
    <target name="Jar" depends="Initialization, Compilation">
        <jar destfile="${jarFile}" basedir="${binDir}"/>
    </target>
    <target name="Build" depends="Initialization, Compilation, Jar">
        <echo message="Ant is building your project."/>
    </target>
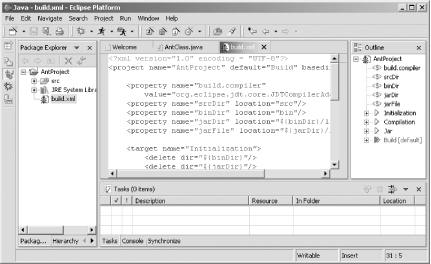
</project>When you enter this XML into build.xml, you can see its properties and targets in the Outline view, as shown in Figure 7-3. Figure 7-3. build.xml in Eclipse The next step is to use this build file to build the application, a process we'll discuss in the following recipe.
7.1.3.1 Eclipse 3.0In Eclipse 3.0, the Ant editor has more support for Ant. It includes tool tips for properties, targets, and referenced objects (such as paths). You can also now reformat an Ant build file using the Format command (Ctrl-Shift-F) from the Ant editor context menu. 7.1.4 See AlsoRecipe 7.2 on building with Ant from Eclipse; Recipe 7.4 on building with a build file other than build.xml; Ant: The Definitive Guide (O'Reilly); the Java XP Cookbook (O'Reilly); Chapter 5 of Eclipse (O'Reilly). |
|
|
< Day Day Up > |
|