DekGenius.com
Previous Section  < Day Day Up >  Next Section

A.4 Downloading and Installing PHP's Friends

To build a web site with PHP, you need a web server. Apache is the most popular web server in the world. It's free, powerful, stable, and secure. What more could you ask for? You probably want a database program to use with your web site. One of the most common choices for a database program to go along with PHP is MySQL. This section shows you how to install Apache and MySQL on your computer.

The instructions in this section are only for people who are installing PHP on their own computers. If you are using a web-hosting provider's PHP setup, then don't install Apache and MySQL yourself. Your hosting provider has taken care of that for you.

A.4.1 Installing Apache

How you install Apache depends on what operating system you're using. Follow the appropriate instructions for your platform.

A.4.1.1 Apache on Windows

Take the following steps to install Apache on Windows:

  1. Go to http://httpd.apache.org/download.cgi and download the most recent version of the "Win32 Binary (MSI Installer)" for Apache 2. This is in a section of the page titled something like "Apache 2.0.49 is the best available version," and has a filename such as apache_2.0.49-win32-x86-no_ssl.msi. (As new versions of Apache are released, the 2.0.49 becomes 2.0.50 or 2.1.0 and so on.)

  2. After the Installer downloads, double-click on it to run it. You should see a window like the one in Figure A-15. Click the Next button to begin the installation procedure.

    Figure A-15. Beginning the Windows Apache installation
    figs/lphp_aa15.gif


  3. Accept the terms of the Apache license agreement as shown in Figure A-16. Read the next screen of background information about Apache and click Next to continue.

    Figure A-16. Accepting the Apache license agreement
    figs/lphp_aa16.gif


  4. On the Server Information screen (Figure A-17), enter the appropriate information. If you're just interested in running Apache on your own computer for testing and experimentation, enter localhost for the network domain and server name. If you're running Apache on a computer that must be properly accessible from the Internet, enter the appropriate domain and server names. Put your email address in the Administrator's Email Address box. Choose the "for All Users . . . " radio button. Click Next to continue.

    Figure A-17. Entering server information
    figs/lphp_aa17.gif


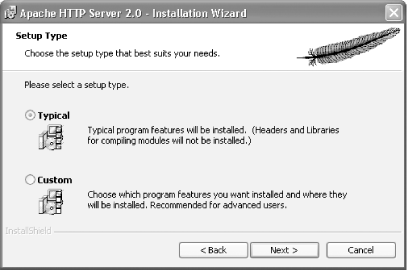
  5. On the Setup Type screen (Figure A-18), pick "Typical" and click Next to continue.

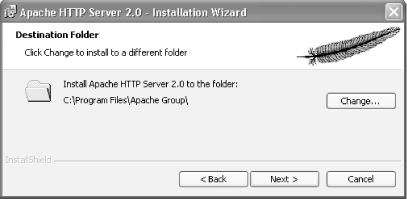
  6. On the Destination Folder screen (Figure A-19), accept the default installation folder (C:\Program Files\Apache Group\) and click Next to continue.

  7. On the next screen, click Install to install Apache.

  8. When the installation has completed, click "Finish" to exit the Installer.

  9. Next, you must install an extension to Apache called FastCGI that improves how PHP and Apache work together. Go to http://www.fastcgi.com/dist/ and download the latest version of the FastCGI program for Apache 2. It has a filename such as mod_fastcgi-2.4.2-AP20.dll. The 2.4.2 part of the filename may change if a later version of FastCGI has been released (such as 2.4.3 or 2.5.0), but the file you download must end with -AP20.dll. Don't download a version of FastCGI that has SNAP in the filename.

  10. Save mod_fastcgi-2.4.2-AP20.dll in C:\Program Files\Apache Group\Apache2\modules. (If you changed Apache's default installation folder, adjust where you save the FastCGI extension as well.)

  11. Edit Apache's configuration file so that it knows about FastCGI. From the Start menu, Select All Programs Apache HTTP Server 2.0.49 Configure Apache Server Edit the Apache httpd.conf Configuration File. Find the block of lines in the file that begin with LoadModule or #LoadModule. (For Apache 2.0.49, these are lines 134-172.)

  12. After the last LoadModule or #LoadModule line (which is #LoadModule ssl_module modules/mod_ssl.so for Apache 2.0.49), add a line that looks like this:

    LoadModule fastcgi_module modules/mod_fastcgi-2.4.2-AP20.dll

    If you downloaded a newer file than FastCGI 2.4.2, adjust the line you add to the Apache configuration file appropriately.

Figure A-18. Selecting the Typical Apache installation
figs/lphp_aa18.gif


Figure A-19. Selecting the Apache installation folder
figs/lphp_aa19.gif


Apache is now set up and ready for PHP to be installed.

A.4.1.2 Apache on OS X

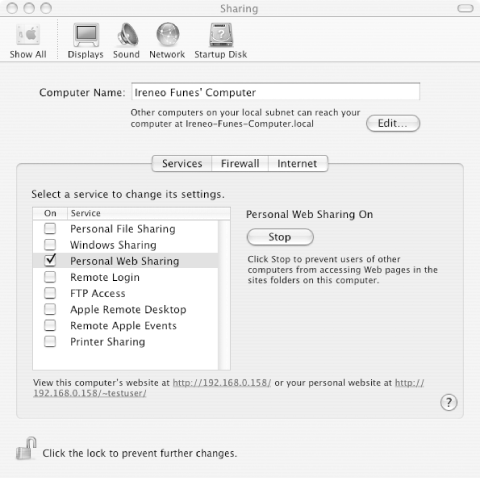
Apache comes preinstalled with OS X. The preinstalled version of Apache is required to work with the www.entropy.ch PHP package. You must turn on Personal Web Sharing in the Sharing panel of the Internet & Network section of the System Preferences application to activate Apache. Figure A-20 shows the Sharing panel.

Figure A-20. Turning on Personal Web Sharing
figs/lphp_aa20.gif


A.4.1.3 Apache on Linux

Apache comes preinstalled on most Linux distributions. If it is not installed, you can install Apache RPMs or packages. Look for Apache packages for your distribution. In Fedora Linux, these packages are the httpd, httpd-devel, and httpd-manual RPMs. In Debian Linux, the appropriate packages are apache, apache-common, and apache-dev.

If prebuilt packages aren't available for your distribution, you can download the source code for Apache from http://httpd.apache.org/download.cgi and build it by following the instructions at http://httpd.apache.org/docs-2.0/install.html.

A.4.2 MySQL

Binary MySQL packages are available for all common operating systems. For MySQL 4.1, go to http://dev.mysql.com/downloads/mysql/4.1.html. If you must use the older 4.0 version of MySQL, go to http://dev.mysql.com/downloads/mysql/4.0.html/. On either page, find the appropriate download for your operating system.

Instructions for installation on Windows are at http://dev.mysql.com/doc/mysql/en/Windows_installation.html. For OS X, they are at http://dev.mysql.com/doc/mysql/en/Mac_OS_X_installation.html. There are also helpful OS X tips at http://www.entropy.ch/software/macosx/mysql/. For Linux, instructions are at http://dev.mysql.com/doc/mysql/en/Linux-RPM.html. Information for other Unix operating systems is at http://dev.mysql.com/doc/mysql/en/Installing_binary.html.

    Previous Section  < Day Day Up >  Next Section