|
|
< Day Day Up > |
|
Recipe 12.5 Deploying a Plug-in12.5.1 ProblemYou want to deploy a plug-in you've created. 12.5.2 SolutionRight-click the plug-in project, click Export, and follow the directions. Eclipse will handle the details. 12.5.3 DiscussionTo deploy a plug-in, right-click the plug-in project and click Export. Check "Deployable plug-ins and fragments" in the Export dialog, and click Next to open the Export Plug-ins and Fragments dialog shown in Figure 12-12. Select org.cookbook.ch12.MenuPlugIn (1.0.0). To create a single deployable .zip file, use the Browse button to browse to eclipse/workspace/org.cookbook.ch12/MenuPlugIn; Eclipse will add the filename MenuPlugIn_1_0_0.zip. Then click Finish. Figure 12-12. Exporting a plug-in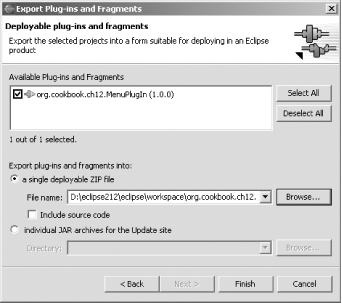 Clicking Finish creates MenuPlugIn_1_0_0.zip, ready for deployment. This file contains two files: MenuPlugIn.jar and plugin.xml. This .zip file, MenuPlugIn_1_0_0.zip, is what you deploy to usersall they've got to do is to unzip it.
|
|
|
< Day Day Up > |
|
